Tiropitakia Savory Cheese Puffs – Authentic Greek Recipe with Phyllo Dough Tutorial
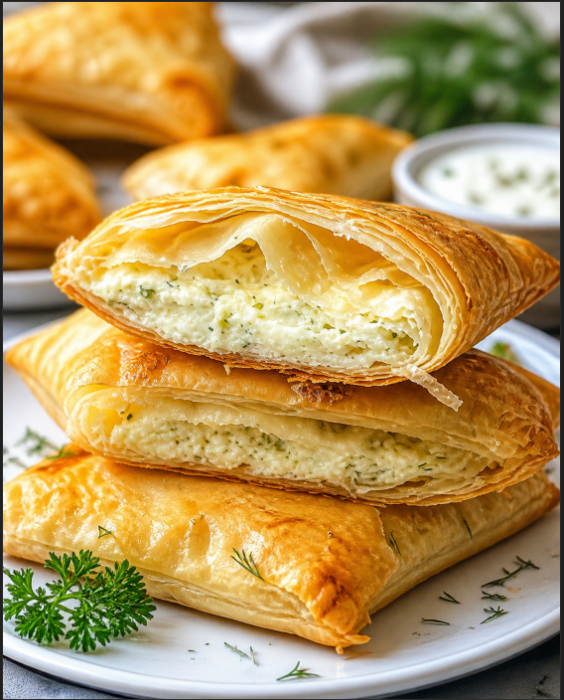
Tiropitakia, also known as Greek savory cheese puffs, are a timeless Mediterranean delicacy that has been passed down through generations. These golden, flaky pastries are filled with a rich and creamy cheese mixture, wrapped in delicate layers of phyllo dough, and baked until perfectly crisp.
Whether served as an appetizer, snack, or part of a festive spread, tiropitakia are always a crowd favorite. Their buttery texture combined with the tangy flavor of feta cheese creates an irresistible bite that keeps everyone coming back for more.
In this guide, you will not only learn how to make authentic tiropitakia but also master working with phyllo dough—a skill that will elevate your baking to the next level.
What Are Tiropitakia?
Tiropitakia are small Greek cheese pastries traditionally made with phyllo dough and a savory cheese filling. The name comes from the Greek words:
- “Tiro” meaning cheese
- “Pitakia” meaning small pies
These pastries are typically folded into triangular shapes and baked until golden brown. They can be made in larger portions as a main dish or smaller bite-sized pieces for appetizers.
Why You’ll Love This Recipe
There are many reasons why tiropitakia remain one of the most beloved Greek recipes:
- Crispy, flaky texture from layers of buttery phyllo dough
- Creamy, savory filling with a balanced flavor
- Versatile and customizable with different herbs or add-ins
- Perfect for parties, holidays, or everyday snacking
- Surprisingly simple once you learn the folding technique
Even if you are new to working with phyllo dough, this tutorial will guide you step-by-step so you can achieve bakery-quality results at home.

Ingredients for Tiropitakia
To make approximately 24 pieces, you will need the following ingredients:
For the Filling:
- 1 1/2 cups feta cheese, crumbled
- 3/4 cup low-fat cottage cheese
- 1 1/2 tablespoons fresh parsley, finely chopped
- 1/2 teaspoon salt
- 3/4 teaspoon dried dill
- 1/2 teaspoon black pepper
- 2 large eggs, beaten
For the Pastry:
- 1 package phyllo dough (defrosted overnight in the refrigerator)
- 2 sticks butter (melted; butter is essential for authentic flavor)
Understanding Phyllo Dough
Phyllo dough is a paper-thin pastry commonly used in Greek and Middle Eastern cooking. While it may seem intimidating at first, it is actually quite easy to work with once you understand a few key principles:
Important Tips:
- Never use frozen phyllo dough; always thaw it overnight in the fridge
- Keep it covered with a damp cloth to prevent drying out
- Work quickly but gently to avoid tearing
- Brush each layer with melted butter for maximum crispiness
If treated properly, phyllo dough becomes one of the most versatile tools in your kitchen.
Step-by-Step Instructions
Step 1: Prepare the Filling
In a medium bowl, combine:
- Feta cheese
- Cottage cheese
- Parsley
- Dill
- Salt and pepper
- Beaten eggs
Mix thoroughly until all ingredients are evenly incorporated. Set aside.
Step 2: Preheat the Oven
Preheat your oven to 375°F (190°C). Line a baking sheet with parchment paper.
Step 3: Prepare the Phyllo Dough
Place the thawed phyllo dough on a clean, flat surface. Using a sharp knife, cut the sheets into long strips.
Immediately cover the strips with a damp paper towel to keep them from drying out.
Step 4: Melt the Butter
Melt the butter using a microwave or stovetop. It is best to melt small amounts at a time (about 1/2 cup) to keep it fresh and easy to work with.
Step 5: Layer and Butter the Dough
Take 2–3 strips of phyllo dough and stack them. Lightly brush each layer with melted butter.
This layering creates the signature flaky texture.
Step 6: Add the Filling
Place about 1 tablespoon of the cheese filling at one end of the phyllo strip.
Step 7: Begin Folding
Starting from the corner, fold the dough over the filling to form a triangle.
Press gently to ensure the filling is evenly distributed.
Step 8: Continue Folding
Fold the triangle over itself repeatedly, similar to folding a flag.
This technique seals the filling and creates the classic tiropitakia shape.
Step 9: Finish the Fold
Continue folding until you reach the end of the dough strip. Trim any excess dough if necessary.
Step 10: Prepare for Baking
Place each triangle onto the lined baking sheet. Brush the tops with melted butter.
Step 11: Bake
Bake in the preheated oven for 18–22 minutes.
Step 12: Check for Doneness
The pastries are ready when they turn golden brown and crispy.
Step 13: Serve
Allow them to cool slightly before serving. Enjoy warm for the best flavor and texture.
Flavor Variations
While the traditional recipe is simple and delicious, you can customize your tiropitakia in many ways:
Add Spinach
Mix in chopped spinach for a variation similar to spanakopita.
Add Garlic
Enhance the flavor with minced garlic for a stronger savory taste.
Try Different Cheeses
Experiment with ricotta, cream cheese, or mozzarella for a different texture.
Make It Sweet
Use honey, nuts, or sweet cheese fillings for a dessert version.
Tips for Perfect Tiropitakia
- Always keep phyllo dough covered while working
- Do not skip the butter—it creates the crisp texture
- Avoid overfilling to prevent leaks
- Use a sharp knife for clean cuts
- Bake until deeply golden for best flavor
Storage and Reheating
Storing:
- Refrigerate leftovers in an airtight container for up to 3 days
Freezing:
- Freeze unbaked or baked pastries for up to 2 months
Reheating:
- Reheat in the oven at 350°F (175°C) for 10–12 minutes
- Avoid microwaving to keep them crispy
Serving Suggestions
Tiropitakia can be served in many ways:
- As an appetizer for parties
- Alongside salads or soups
- As part of a Mediterranean platter
- With dips like tzatziki or yogurt sauce
They are elegant, versatile, and suitable for both casual and formal occasions.
Nutritional Overview
While tiropitakia are rich and buttery, they can be enjoyed in moderation as part of a balanced diet.
Using low-fat cottage cheese helps reduce calories while maintaining a creamy texture.
Why This Recipe Stands Out
This traditional recipe has been passed down through generations, preserving authentic Greek flavors and techniques.
What makes it special:
- Simple ingredients with bold flavor
- Classic folding method that enhances texture
- Adaptable to modern tastes while staying authentic
Final Thoughts
Tiropitakia savory cheese puffs are a perfect example of how simple ingredients can create something extraordinary. With their flaky layers, creamy filling, and golden finish, they bring both comfort and elegance to any table.
Once you master working with phyllo dough, you will discover endless possibilities in your cooking. These pastries are not only delicious but also a rewarding experience to make.
Whether you are preparing them for a holiday gathering or a casual snack, tiropitakia will always impress.