
Crispy Cups Recipe: The Ultimate No-Bake Chocolate and Peanut Butter Treat
If you are looking for an easy dessert that combines rich chocolate, creamy peanut butter, and a satisfying crunch, these Crispy Cups are the perfect recipe to try. This no-bake dessert is quick to prepare, requires only a handful of ingredients, and delivers incredible flavor in every bite. Whether you need a simple afternoon snack, a homemade treat for guests, or a fun recipe to make with kids, these chocolate peanut butter crispy cups are guaranteed to become a favorite.
The best part about this recipe is its simplicity. There is no need to turn on the oven, no complicated techniques, and no long preparation time. With just a few pantry ingredients like chocolate, peanut butter, puffed rice, and oats, you can create a delicious dessert that looks impressive and tastes even better.
In this complete guide, you will learn everything about making Crispy Cups, including ingredient tips, variations, storage instructions, serving ideas, and expert techniques to ensure perfect results every time.
What Are Crispy Cups?
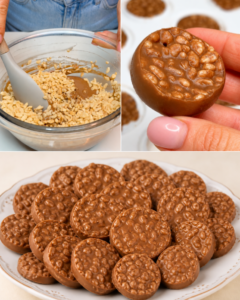
Crispy Cups are small no-bake chocolate treats made by combining melted chocolate, peanut butter, puffed rice, and rolled oats. The mixture is pressed into muffin molds or cupcake liners and chilled until firm.
They are similar to classic rice crispy treats but with a richer flavor thanks to the chocolate and peanut butter combination. The texture is what makes these treats truly special. The smooth melted chocolate coats the crispy puffed rice and chewy oats, creating a crunchy yet creamy bite.
These treats are ideal for:
- Quick desserts
- Party snacks
- Lunchbox treats
- Holiday platters
- Meal prep sweets
- Homemade edible gifts
Because they are stored cold, they also make a refreshing dessert during warm weather.
Why You Will Love This Crispy Cups Recipe
1. No Baking Required
One of the biggest advantages of this recipe is that it requires no oven at all. You simply melt, mix, and chill. This makes the recipe perfect for beginners or for hot summer days when you do not want to bake.
2. Ready in Minutes
The active preparation time is only around 15 minutes. After that, the refrigerator does all the work.
3. Perfect Chocolate and Peanut Butter Combination
Chocolate and peanut butter are one of the most loved dessert pairings in the world. The sweetness of chocolate perfectly balances the salty creaminess of peanut butter.
4. Crispy and Crunchy Texture
The puffed rice adds lightness and crunch while the oats create a chewy texture that makes every bite satisfying.
5. Great for Meal Prep
These crispy cups store well in the fridge and freezer, making them excellent for preparing ahead of time.
6. Kid-Friendly Recipe
Children love both making and eating these treats. Since there is no baking involved, it is a safe and fun recipe for kids to help prepare.
Ingredients for Crispy Cups
Here is everything you need to make these delicious no-bake chocolate peanut butter treats.
Dark or Milk Chocolate – 200 grams
You can use either dark chocolate or milk chocolate depending on your taste preference.
Dark Chocolate
- Richer flavor
- Less sweet
- More intense chocolate taste
Milk Chocolate
- Sweeter
- Creamier
- Kid-friendly flavor
Choose high-quality chocolate for the best texture and flavor.
Creamy Peanut Butter – 200 grams
Creamy peanut butter creates the smooth filling and rich nutty flavor.
For best results:
- Use smooth peanut butter
- Avoid overly oily natural peanut butter
- Choose a brand with a creamy consistency
You can also substitute:
- Almond butter
- Cashew butter
- Sunflower seed butter
Coconut Oil or Butter – 40 grams
Adding coconut oil or butter helps:
- Melt the chocolate smoothly
- Create a glossy texture
- Keep the cups soft but firm
Coconut oil is especially popular because it helps the treats set beautifully in the fridge.
Puffed Rice – 75 grams
Puffed rice gives the crispy cups their signature crunch.
You can use:
- Rice cereal
- Plain puffed rice
- Crispy rice cereal
Be careful not to crush the rice while mixing.
Rolled Oats – 50 grams
Rolled oats add:
- Chewy texture
- Fiber
- Extra structure
Quick oats can work as well, but rolled oats provide the best texture.
Kitchen Tools You Need
To make this recipe successfully, you will need:
- Large mixing bowl
- Spoon or spatula
- Microwave-safe bowl or double boiler
- Muffin tin
- Paper cupcake liners
- Refrigerator
Optional tools:
- Cookie scoop
- Silicone molds
- Kitchen scale
How to Make Crispy Cups Step by Step
Step 1: Prepare the Muffin Tin
Line a 12-cavity muffin tin with paper liners or silicone molds.
This helps:
- Easy removal
- Cleaner presentation
- Less sticking
If you prefer, lightly grease the molds instead.
Step 2: Melt the Chocolate
Place the chocolate and coconut oil into a microwave-safe bowl.
Microwave Method
- Heat in 30-second intervals
- Stir between each interval
- Continue until fully melted
Double Boiler Method
- Place bowl over simmering water
- Stir continuously
- Melt gently without overheating
The mixture should become smooth and glossy.
Step 3: Add the Peanut Butter
Stir the peanut butter into the melted chocolate.
Mix until:
- Smooth
- Thick
- Fully combined
If the mixture becomes too thick, heat for another 20 seconds to loosen it.
Step 4: Fold in Puffed Rice and Oats
Add:
- Puffed rice
- Rolled oats
Fold gently using a spatula.
Avoid stirring too aggressively because you want the puffed rice to remain crispy.
At this stage, the mixture should look thick, crunchy, and evenly coated.
Step 5: Fill the Muffin Tin
Spoon the mixture evenly into the muffin cups.
Press lightly using the back of a spoon to:
- Compact the mixture
- Create smooth tops
- Help the cups hold shape
Do not press too firmly or the texture may become dense.
Step 6: Chill Until Firm
Place the tray in the refrigerator for about 1 hour.
The cups are ready when:
- Firm to the touch
- Easy to remove from liners
- Fully set
Tips for Perfect Crispy Cups
Use Good Chocolate
High-quality chocolate makes a huge difference in flavor and texture.
Cheap chocolate may:
- Become grainy
- Taste overly sweet
- Melt poorly
Do Not Overheat the Chocolate
Chocolate burns easily.
Always:
- Melt slowly
- Stir frequently
- Avoid high heat
Fold Gently
Mix carefully so the puffed rice stays light and crunchy.
Overmixing can crush the cereal and reduce the crisp texture.
Chill Properly
The cups need enough chilling time to firm up completely.
For best results:
- Chill at least 1 hour
- Store cold until serving
Add Extra Texture
You can customize the recipe with:
- Chopped peanuts
- Almonds
- Walnuts
- Pumpkin seeds
- Shredded coconut
Delicious Variations to Try
White Chocolate Crispy Cups
Replace dark chocolate with white chocolate for a sweeter version.
Nut-Free Crispy Cups
Use sunflower seed butter instead of peanut butter.
Perfect for school-safe snacks.
Vegan Crispy Cups
Use:
- Dairy-free chocolate
- Coconut oil
- Vegan chocolate chips
Make sure all ingredients are certified vegan.
Protein Crispy Cups
Add:
- Protein powder
- Chia seeds
- Hemp seeds
Great for post-workout snacks.
Salted Chocolate Version
Sprinkle flaky sea salt on top before chilling.
This enhances the chocolate flavor beautifully.
Caramel Crispy Cups
Drizzle caramel sauce over the top before serving for an indulgent dessert.
How to Store Crispy Cups
Refrigerator Storage
Store in an airtight container in the fridge for up to 3 days.
Keep them chilled to maintain:
- Shape
- Texture
- Freshness
Separate layers with parchment paper to prevent sticking.
How to Freeze Crispy Cups
These treats freeze extremely well.
Freezing Instructions
- Place cups on a tray
- Freeze until solid
- Transfer to freezer-safe container
They can be frozen for up to 1 month.
How to Thaw
Remove from freezer and let sit at room temperature for:
- 10 to 15 minutes
The texture remains crunchy and delicious.
Best Ways to Serve Crispy Cups
These no-bake treats are versatile and work for many occasions.
Dessert Tray
Serve alongside:
- Brownies
- Cookies
- Mini cheesecakes
Afternoon Snack
Pair with:
- Coffee
- Tea
- Milk
Party Treats
Arrange on a dessert platter for birthdays or gatherings.
Lunchbox Snack
Kids love these sweet crunchy treats in lunchboxes.
Homemade Gifts
Wrap in decorative boxes or jars for holidays and special occasions.
Are Crispy Cups Healthy?
While these are definitely a dessert, they contain ingredients that offer some nutritional value.
Benefits of Oats
- Fiber
- Whole grains
- Slow-digesting carbs
Benefits of Peanut Butter
- Protein
- Healthy fats
- Nutty flavor
Dark Chocolate Benefits
- Antioxidants
- Rich cocoa flavor
To make them healthier:
- Use dark chocolate
- Reduce sweeteners
- Add seeds or nuts
Common Mistakes to Avoid
Using Too Much Heat
Overheated chocolate can become:
- Grainy
- Thick
- Burnt
Always melt slowly.
Overpacking the Mixture
Press lightly only.
Too much pressure makes the cups dense instead of crispy.
Not Chilling Long Enough
Warm cups will fall apart.
Allow enough time for proper setting.
Using Watery Peanut Butter
Very oily peanut butter can affect texture.
Use creamy stabilized peanut butter for best results.
Frequently Asked Questions
Can I Use Crunchy Peanut Butter?
Yes. Crunchy peanut butter adds even more texture and nutty flavor.
Can I Make These Without Oats?
Absolutely. You can replace oats with:
- More puffed rice
- Crushed cereal
- Chopped nuts
Can I Use Honey or Maple Syrup?
Yes. Adding a small amount creates a sweeter and softer texture.
How Long Do Crispy Cups Last?
- Refrigerator: up to 3 days
- Freezer: up to 1 month
Can I Make Mini Versions?
Yes. Use mini muffin tins for bite-sized treats.
They are perfect for parties and snack platters.
Expert Tips for the Best Texture
For the perfect crispy cups:
- Use fresh puffed rice
- Do not overmix
- Chill thoroughly
- Use quality chocolate
- Keep refrigerated until serving
The balance between creamy chocolate and crispy cereal is what makes this dessert so addictive.
Final Thoughts
These Crispy Cups are one of the easiest and most satisfying no-bake desserts you can make at home. With their rich chocolate flavor, creamy peanut butter filling, and irresistible crunchy texture, they are guaranteed to impress both kids and adults alike.
Whether you are preparing snacks for the week, hosting a party, or simply craving something sweet, this recipe delivers incredible flavor with minimal effort. The combination of simple ingredients and easy preparation makes these crispy cups perfect for beginner cooks and experienced dessert lovers alike.
Once you try this recipe, you will understand why chocolate and peanut butter remain one of the most popular dessert combinations ever created.
Make a batch today and enjoy a crunchy, creamy, chocolate-filled treat that everyone will love.
Crispy Cups Recipe
Ingredients
- 200g dark or milk chocolate
- 200g creamy peanut butter
- 40g coconut oil or butter
- 75g puffed rice
- 50g rolled oats
Instructions
- Melt chocolate with coconut oil or butter.
- Stir in peanut butter until smooth.
- Fold in puffed rice and oats.
- Spoon mixture into muffin liners.
- Chill for 1 hour until firm.
- Serve and enjoy.