No Bake Tiled Biscuit Cake With Vanilla Pudding: The Ultimate Creamy No-Bake Dessert Everyone Will Love
No-bake desserts have become some of the most beloved treats in modern kitchens. They are easy to prepare, require minimal equipment, and often deliver rich flavors with very little effort. Among the many no-bake recipes available today, the No Bake Tiled Biscuit Cake With Vanilla Pudding stands out as one of the most comforting and visually impressive desserts you can make at home.
This creamy layered cake combines soft ladyfinger biscuits, chocolate cookies, silky homemade vanilla custard, and a dusting of cocoa powder into a dessert that tastes luxurious while remaining incredibly simple to prepare. Unlike traditional cakes that require baking, precise temperatures, and complicated decorating techniques, this recipe relies on chilling time to transform ordinary ingredients into a soft, cake-like masterpiece.
The result is a dessert with layers of flavor and texture. The biscuits absorb the creamy vanilla pudding, becoming tender and moist, while the chocolate cookies add richness and contrast. Once chilled, every slice reveals a beautiful tiled pattern that looks elegant enough for celebrations, holidays, dinner parties, or family gatherings.
In this complete guide, you will learn everything about making the perfect No Bake Tiled Biscuit Cake With Vanilla Pudding, including ingredient tips, step-by-step instructions, storage advice, variations, serving suggestions, and expert techniques for creating a flawless dessert every single time.
What Is No Bake Tiled Biscuit Cake With Vanilla Pudding?
No Bake Tiled Biscuit Cake is a layered dessert made by arranging ladyfinger biscuits and chocolate cookies inside a cake pan and covering them with a homemade vanilla custard pudding. The dessert is then refrigerated for several hours until the biscuits soften and develop a cake-like texture.
The “tiled” appearance comes from the alternating arrangement of biscuits and cookies inside the pan. Once sliced, the interior reveals beautiful geometric layers that resemble decorative tiles.
This dessert is popular because it combines several favorite dessert elements:
- Creamy vanilla custard
- Soft soaked biscuits
- Rich chocolate flavor
- Elegant layered presentation
- Easy preparation without baking
Unlike cheesecakes or mousse cakes that may require gelatin or cream cheese, this recipe uses a simple stovetop custard made with milk, egg, flour, starch, sugar, vanilla, and lemon zest.
The dessert is ideal for beginners because it does not involve complicated baking techniques. It is also perfect during warm weather when you want a homemade dessert without turning on the oven.

Why You Will Love This No-Bake Biscuit Cake
There are countless reasons why this dessert has become a favorite in kitchens around the world.
No Oven Required
One of the biggest advantages of this recipe is that it requires absolutely no baking. This makes it convenient during summer months or for anyone without access to an oven.
Easy to Make
The preparation process is straightforward and beginner-friendly. Even if you have little experience making desserts, you can successfully prepare this cake.
Budget-Friendly Ingredients
Most of the ingredients are affordable pantry staples such as milk, sugar, flour, cookies, and vanilla.
Beautiful Presentation
Once sliced, the layered design creates an elegant appearance that looks professionally made.
Perfect Make-Ahead Dessert
Since the cake needs time to chill, it is ideal for preparing a day in advance.
Rich Yet Light Flavor
The vanilla custard provides creamy richness without becoming overly heavy, while the lemon zest adds freshness and balance.
The History Behind Biscuit Cakes
No-bake biscuit cakes have existed in many forms across Europe and other parts of the world for decades. Different cultures have their own versions using tea biscuits, graham crackers, wafers, or sponge cookies layered with cream fillings.
These desserts became especially popular because they allowed families to create elegant sweets without expensive equipment or baking expertise.
Ladyfinger-based desserts are particularly famous in Italian cuisine, where they are used in tiramisu and layered puddings. The soft texture of soaked ladyfingers makes them ideal for absorbing creams and custards.
The tiled biscuit cake takes inspiration from these traditional layered desserts while adding a decorative visual effect through the careful arrangement of cookies.
Today, no-bake biscuit cakes continue to trend online because they combine nostalgia, convenience, and beautiful presentation.
Ingredients for No Bake Tiled Biscuit Cake
Understanding each ingredient will help you create the best possible version of this dessert.
Egg
The egg helps thicken the custard while giving it a smooth and rich texture.
Tip:
Use room-temperature eggs for easier mixing.
Milk
Milk forms the base of the custard and creates its creamy consistency.
Best Choice:
Whole milk works best because it creates a richer pudding.
Flour
Flour contributes structure and stability to the custard.
Tip:
Whisk thoroughly to prevent lumps.
Starch
Cornstarch or potato starch helps the custard become silky and thick.
Why It Matters:
The starch gives the pudding its smooth texture without becoming too dense.
Sugar
Sugar sweetens the custard and balances the bitterness of cocoa and chocolate cookies.
Tip:
Adjust sweetness slightly depending on your preference.
Vanilla
Vanilla adds warmth and depth to the pudding flavor.
Best Option:
Pure vanilla extract or vanilla sugar both work beautifully.
Lemon Zest
Lemon zest brightens the custard and prevents the dessert from tasting overly heavy.
Important:
Use only the yellow outer layer of the lemon to avoid bitterness.
Cocoa Cookies
Chocolate cookies provide contrast against the vanilla custard and create the signature tiled appearance.
Best Type:
Thin rectangular chocolate biscuits work best.
Ladyfinger Biscuits
Ladyfingers absorb milk and custard while becoming soft and cake-like.
Tip:
Do not oversoak them or they may become mushy.
Cocoa Powder
Cocoa powder is used for decoration and adds an elegant finish to the dessert.
Kitchen Equipment You Will Need
This recipe does not require complicated equipment.
You will need:
- Square cake pan
- Saucepan
- Whisk
- Mixing bowls
- Plastic wrap
- Fine mesh strainer
- Measuring cups
- Spatula
Optional tools include parchment paper and a sifter for dusting cocoa.
Step-by-Step Guide to Making No Bake Tiled Biscuit Cake
Step 1: Prepare the Cake Pan
Line your square cake pan with parchment paper for easy removal later.
This simple step prevents sticking and helps maintain clean slices.
Step 2: Soak the Ladyfingers
Pour milk into a shallow bowl.
Dip each ladyfinger briefly into the milk.
Important:
Do not leave them in the milk too long. A quick dip is enough.
Oversoaked ladyfingers can fall apart before layering.
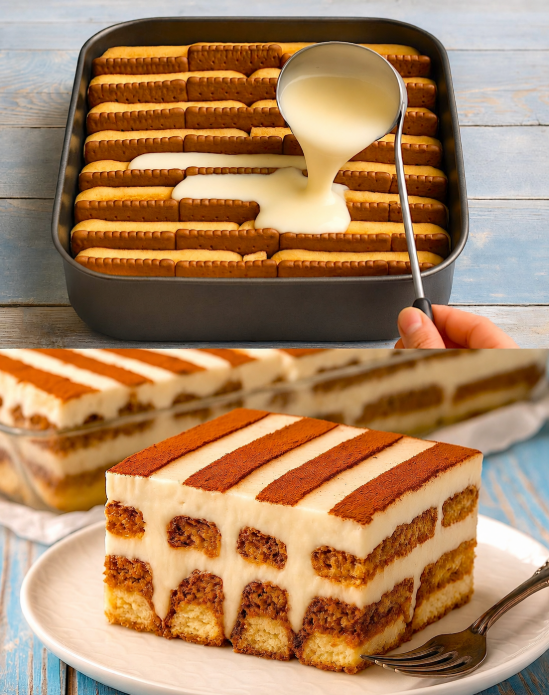
Step 3: Arrange the First Layer
Place soaked ladyfingers into the bottom of the pan.
Alternate them with chocolate cookies to create the tiled pattern.
Press gently so the cookies fit tightly together.
Step 4: Make the Vanilla Custard
In a saucepan, combine:
- Milk
- Egg
- Flour
- Starch
- Sugar
- Vanilla
- Lemon zest
Whisk everything thoroughly before heating.
Place the saucepan over medium heat.
Continue whisking constantly while the mixture cooks.
After several minutes, the custard will begin to thicken.
Important Tip:
Never stop whisking or lumps may form.
Step 5: Check Custard Consistency
The custard is ready when it becomes thick, creamy, and smooth.
It should coat the back of a spoon without being overly stiff.
If small lumps appear, strain the custard through a fine mesh sieve.
Step 6: Pour Custard Over the Cookies
Carefully pour the warm custard over the biscuit layers.
Use a spatula to spread evenly.
The cookies will gradually absorb the custard during chilling.
Step 7: Chill the Cake
Cover the cake with plastic wrap.
Place it in the refrigerator for at least 4 to 6 hours.
For best results, refrigerate overnight.
This resting time is essential because it allows the biscuits to soften fully.
Step 8: Decorate With Cocoa Powder
Place strips of parchment paper across the top of the cake.
Dust cocoa powder evenly over the surface.
Carefully remove the strips to reveal decorative cocoa lines.
This simple technique creates a professional bakery-style appearance.
Step 9: Slice and Serve
Use a sharp knife to cut clean slices.
Serve chilled for the best texture and flavor.
Expert Tips for the Perfect No-Bake Biscuit Cake
Use Full-Fat Milk
Whole milk creates a richer and creamier custard.
Chill Overnight
While a few hours may work, overnight chilling provides the best texture.
Whisk Constantly
Continuous whisking prevents lumps and scorching.
Avoid Oversoaking
Ladyfingers absorb liquid quickly.
Too much soaking can cause a soggy dessert.
Use a Sharp Knife
Clean slices reveal the beautiful tiled interior.
Wipe the knife between cuts for perfect presentation.
Common Mistakes to Avoid
Using Hot Custard Incorrectly
Allow the custard to cool slightly before pouring if it seems extremely hot.
Very hot custard can soften the cookies too quickly.
Skipping Chilling Time
The dessert needs sufficient refrigeration to set properly.
Making Custard Too Thick
Overcooked custard can become pasty.
Cook only until smooth and creamy.
Uneven Cookie Layers
Try to align the cookies neatly for the best appearance when sliced.
Delicious Variations to Try
This recipe is incredibly versatile.
Chocolate Custard Version
Replace some flour with cocoa powder for a chocolate-flavored pudding.
Coffee Flavor
Add espresso powder or coffee extract for a tiramisu-inspired dessert.
Orange Custard
Swap lemon zest for orange zest to create a citrus variation.
Nutty Version
Add chopped hazelnuts or almonds between layers.
Coconut Twist
Mix shredded coconut into the custard for tropical flavor.
Berry Addition
Layer sliced strawberries or raspberries between the cookies.
Can You Make This Cake Ahead of Time?
Absolutely.
This dessert is actually better when prepared in advance because chilling improves both texture and flavor.
You can prepare it:
- One day ahead
- The night before serving
- Several hours before guests arrive
This makes it perfect for parties and holidays.
How to Store No Bake Biscuit Cake
Refrigerator Storage
Cover the cake tightly with plastic wrap or store in an airtight container.
It stays fresh for about 3 to 4 days.
Can You Freeze It?
Yes, although the texture may soften slightly after thawing.
Freeze individual slices for easier serving.
Thaw in the refrigerator overnight before eating.
Best Occasions for Serving This Dessert
This elegant no-bake cake works for many occasions.
Family Gatherings
Its comforting flavor makes it ideal for sharing.
Summer Parties
No oven means less heat in the kitchen.
Birthday Celebrations
The decorative appearance makes it feel festive.
Holiday Dinners
The layered design looks impressive on dessert tables.
Afternoon Coffee Breaks
The creamy vanilla and chocolate combination pairs perfectly with coffee.
What to Serve With No Bake Biscuit Cake
This dessert pairs beautifully with:
- Espresso
- Cappuccino
- Black coffee
- Hot chocolate
- Tea
- Fresh berries
- Vanilla ice cream
- Whipped cream
Nutritional Overview
While this dessert is indulgent, it can still fit into balanced eating when enjoyed in moderation.
The recipe contains:
- Carbohydrates from biscuits and sugar
- Protein from milk and eggs
- Fat from cookies and milk
- Calcium from dairy ingredients
You can lighten the recipe slightly by reducing sugar or using lower-fat milk, though the texture may change.
Why This Recipe Works So Well
The science behind this dessert is surprisingly simple.
The biscuits absorb moisture from both milk and custard. As they soften, they create a texture similar to sponge cake without requiring baking.
Meanwhile, the starch and egg proteins in the custard thicken when heated, creating a smooth pudding that stabilizes the dessert.
The chilling process allows all flavors and textures to merge into one cohesive cake.
Frequently Asked Questions
Can I Use Different Cookies?
Yes.
You can substitute the chocolate cookies with other thin biscuits or cookies.
However, ladyfingers are strongly recommended because of their texture.
Can I Make It Gluten-Free?
Yes.
Use gluten-free biscuits and replace flour with gluten-free alternatives.
Why Did My Custard Turn Lumpy?
This usually happens if the heat is too high or whisking stops during cooking.
Straining the custard can fix the issue.
Can I Use Plant-Based Milk?
Yes.
Oat milk or almond milk may work, although the custard may be slightly less rich.
How Long Does It Need to Chill?
At least 4 hours.
Overnight is ideal.
Final Thoughts
No Bake Tiled Biscuit Cake With Vanilla Pudding is the perfect example of how simple ingredients can create a truly memorable dessert. With its creamy vanilla custard, soft biscuit layers, rich chocolate flavor, and elegant appearance, this dessert delivers comfort and sophistication at the same time.
One of the best things about this recipe is its accessibility. You do not need advanced baking skills, expensive tools, or complicated ingredients. All you need is patience while the cake chills and transforms into a creamy layered masterpiece.
Whether you are preparing dessert for a family gathering, holiday dinner, birthday celebration, or casual weekend treat, this no-bake biscuit cake is guaranteed to impress.
Its beautiful tiled design, refreshing vanilla flavor, and melt-in-your-mouth texture make it a dessert people will ask for again and again.
If you are searching for an easy no-bake dessert recipe that looks elegant and tastes incredible, this No Bake Tiled Biscuit Cake With Vanilla Pudding deserves a place in your kitchen.