Giant Peanut Butter Cup Recipe: The Ultimate No-Bake Chocolate and Peanut Butter Dessert
A Giant Reese’s-Inspired Dessert You Can Make at Home
If you are a fan of chocolate and peanut butter, this Giant Peanut Butter Cup recipe is about to become your new favorite dessert. Inspired by the famous Reese’s Peanut Butter Cups, this oversized version combines a rich chocolate shell with a creamy peanut butter filling in one irresistible no-bake treat.
This dessert is perfect for birthdays, family gatherings, holiday celebrations, or simply satisfying your sweet cravings. The best part is that you do not need an oven to make it. With just a few ingredients and simple preparation steps, you can create a bakery-style dessert right in your kitchen.
In this complete guide, you will learn:
- How to make the perfect Giant Peanut Butter Cup
- Tips for achieving a smooth chocolate shell
- The best ingredients to use
- Delicious recipe variations
- Storage instructions
- Common mistakes to avoid
- Serving ideas and presentation tips
Whether you are an experienced baker or a beginner, this recipe is easy to follow and guaranteed to impress.
What Is a Giant Peanut Butter Cup?
A Giant Peanut Butter Cup is a large tart-like dessert made with layers of chocolate and peanut butter filling. It is essentially a giant version of the classic Reese’s candy, but even creamier and more satisfying.
The dessert typically includes:
- A thick chocolate shell
- A smooth peanut butter center
- A glossy chocolate topping
Unlike traditional baked desserts, this recipe is completely no-bake, making it ideal for warm weather or quick dessert preparation.
The contrast between crunchy chocolate and soft peanut butter filling creates a rich and indulgent texture that dessert lovers cannot resist.
Why You Will Love This Recipe
There are many reasons why this dessert has become so popular.
No Baking Required
You do not need to turn on the oven. The freezer does all the work.
Easy to Make
Even beginner cooks can successfully prepare this dessert with minimal effort.
Perfect Flavor Combination
Chocolate and peanut butter are one of the most iconic dessert pairings ever created.
Beautiful Presentation
Once sliced, the clean layers look stunning and professional.
Great for Any Occasion
This dessert works perfectly for:
- Parties
- Potlucks
- Family dinners
- Holiday gatherings
- Birthday celebrations
Ingredients for Giant Peanut Butter Cup
This recipe serves approximately 10 people.
For the Chocolate Shell
- 700 g dark chocolate
- 30 g vegetable shortening
For the Peanut Butter Filling
- 240 g powdered sugar
- 60 g cracker crumbs
- 225 g peanut butter
- 85 g melted butter
Choosing the Best Chocolate
The quality of chocolate significantly affects the final result.
Dark Chocolate
Dark chocolate creates a rich and balanced flavor that prevents the dessert from becoming overly sweet.
Milk Chocolate
Milk chocolate produces a sweeter, more traditional Reese’s-style taste.
Semi-Sweet Chocolate
This option offers a balance between sweetness and bitterness.
For best results, choose high-quality chocolate bars instead of low-quality chocolate chips.
The Best Peanut Butter for This Recipe
Smooth peanut butter works best because it creates a creamy filling with a soft texture.
Avoid:
- Natural peanut butter that separates too much
- Extremely oily peanut butter
- Chunky peanut butter if you want a smooth finish
Creamy commercial peanut butter is ideal for achieving the classic peanut butter cup texture.
Kitchen Tools You Need
Before starting, prepare the following tools:
- 9-inch tart pan with removable bottom
- Mixing bowls
- Spatula
- Microwave or double boiler
- Parchment paper
- Freezer or refrigerator
Step-by-Step Giant Peanut Butter Cup Recipe
Step 1: Melt the Chocolate
Place 300 g of dark chocolate in a heatproof bowl.
You can melt it using:
- A double boiler
- A microwave in short intervals
Once melted, add 10 g of vegetable shortening and stir until smooth and glossy.
The shortening helps create a softer chocolate shell that slices easily.
Step 2: Prepare the Tart Pan
Line the base of the tart pan with parchment paper.
Lightly grease the sides if necessary to make removal easier later.
Using a removable-bottom tart pan helps maintain the dessert’s clean shape.
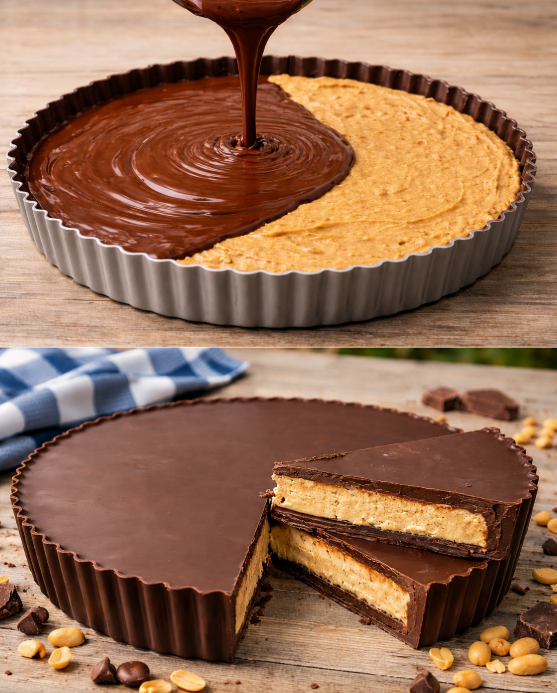
Step 3: Create the Chocolate Base
Pour the melted chocolate into the tart pan.
Use a spatula to spread the chocolate evenly across:
- The bottom
- The sides of the pan
Make sure the chocolate layer is thick enough to support the filling.
Gently shake the pan to remove air bubbles.
Place the pan in the freezer for about 30 minutes.
Making the Peanut Butter Filling
Step 4: Combine the Ingredients
In a large bowl, mix together:
- Powdered sugar
- Cracker crumbs
- Peanut butter
- Melted butter
Mix until the ingredients form a thick paste.
The filling should be soft, smooth, and easy to press into the pan.
Step 5: Add the Filling
Remove the chocolate shell from the freezer.
Press the peanut butter mixture into the center of the chocolate shell.
Leave about 5–10 mm of space around the edges so the top chocolate layer can seal properly.
A helpful trick is to slightly wet your hands before pressing the filling into place.
Finishing the Dessert
Step 6: Add the Top Chocolate Layer
Melt the remaining 400 g of chocolate with the remaining vegetable shortening.
Pour the melted chocolate over the peanut butter filling.
Gently shake the pan to spread the chocolate evenly and remove gaps.
Smooth the surface with a spatula if necessary.
Step 7: Freeze Until Firm
Place the dessert in the freezer for at least 1 hour.
Once fully set:
- Carefully remove the tart pan
- Transfer the dessert to a serving plate
Your Giant Peanut Butter Cup is now ready to enjoy.
Tips for the Perfect Giant Peanut Butter Cup
Use High-Quality Ingredients
Since the recipe uses only a few ingredients, quality matters.
Premium chocolate and peanut butter create a much better flavor.
Chill Between Layers
Proper chilling helps maintain clean layers and prevents mixing.
Make the Chocolate Layer Thick Enough
Thin chocolate shells can crack when sliced.
Do Not Overfill
Leaving space around the edges helps seal the dessert properly.
Delicious Recipe Variations
One of the best things about this dessert is how customizable it is.
Milk Chocolate Peanut Butter Cup
Replace dark chocolate with milk chocolate for a sweeter and creamier dessert.
This version tastes very similar to classic Reese’s cups.
Crunchy Peanut Butter Version
Use crunchy peanut butter or add chopped peanuts for extra texture.
Salted Caramel Peanut Butter Cup
Add a thin layer of salted caramel between the chocolate and peanut butter filling.
This creates an even richer dessert experience.
White Chocolate Version
Use white chocolate for part of the shell for a sweeter and more decorative appearance.
Vegan Giant Peanut Butter Cup
For a dairy-free version, use:
- Vegan chocolate
- Plant-based butter
- Dairy-free peanut butter
Keto and Sugar-Free Option
To make a lower-carb version:
Replace:
- Powdered sugar with erythritol
- Regular chocolate with sugar-free chocolate
This variation is ideal for keto diets.
How to Serve Giant Peanut Butter Cup
This dessert tastes amazing:
- Cold from the refrigerator
- Slightly softened at room temperature
- With vanilla ice cream
- With whipped cream
- Drizzled with chocolate sauce
Decoration Ideas
Make your dessert even more beautiful with these toppings:
- Chopped peanuts
- Chocolate shavings
- Sea salt flakes
- Cocoa powder
- Melted peanut butter drizzle
How to Slice It Perfectly
For clean slices:
- Use a sharp knife
- Warm the knife slightly before cutting
- Wipe the blade between slices
This helps prevent cracking and keeps the layers neat.
Storage Instructions
Refrigerator Storage
Store the Giant Peanut Butter Cup in the refrigerator for up to 7 days.
Cover it with plastic wrap or place it in an airtight container.
Freezer Storage
Individual slices can be frozen for up to 2 months.
Wrap each slice separately before freezing.
Allow frozen slices to thaw slightly before serving.
Common Mistakes to Avoid
Using Poor-Quality Chocolate
Cheap chocolate may become grainy or break easily.
Skipping the Chilling Time
Patience is important. Each layer needs time to set properly.
Making the Chocolate Shell Too Thin
A thicker shell creates better structure and texture.
Using Runny Peanut Butter
Oily peanut butter can make the filling unstable.
Nutritional Information
This dessert is rich and indulgent, so it is best enjoyed in moderation.
A typical slice contains:
- Chocolate
- Healthy fats from peanuts
- Sugar
- Protein
- Calories
Because it is rich, even small slices feel satisfying.
Why Chocolate and Peanut Butter Work So Well Together
Chocolate and peanut butter are considered one of the greatest dessert combinations because they balance each other perfectly.
The salty, nutty flavor of peanut butter enhances the sweetness of chocolate, while the creamy filling contrasts beautifully with the firm chocolate shell.
This balance of:
- Sweet
- Salty
- Creamy
- Crunchy
creates a highly addictive flavor experience.
Creative Ways to Customize the Recipe
Add Cookie Pieces
Crushed cookies can create extra crunch inside the filling.
Add Pretzels
Pretzels provide a salty crunch that pairs perfectly with chocolate.
Make Mini Versions
Use muffin tins to create individual mini peanut butter cups.
Add Espresso Powder
A small amount of espresso powder deepens the chocolate flavor.
Frequently Asked Questions
Can I Use Crunchy Peanut Butter?
Yes, but the filling will have a rougher texture.
Can I Use Graham Crackers Instead of Crackers?
Absolutely. Graham crackers work very well in this recipe.
Is the Freezer Necessary?
The freezer speeds up the setting process, but the refrigerator also works with longer chilling times.
Can I Make This Dessert Ahead of Time?
Yes. In fact, the flavor becomes even better after resting overnight.
The History Behind Peanut Butter Cups
Peanut butter cups became famous in the United States thanks to Reese’s candies, first introduced in the 1920s.
Their popularity exploded because of the perfect combination of:
- Sweet milk chocolate
- Salty peanut butter filling
Today, peanut butter cups are one of the most beloved chocolate treats worldwide.
The Giant Peanut Butter Cup recipe takes inspiration from this classic candy and transforms it into a show-stopping homemade dessert.
Why This Dessert Is Perfect for Parties
This recipe is ideal for entertaining because:
- It can be prepared ahead of time
- It serves many people
- It looks impressive when sliced
- It requires minimal preparation effort
Guests are always amazed by the giant peanut butter cup appearance.
Final Thoughts
This Giant Peanut Butter Cup recipe is the ultimate no-bake dessert for chocolate and peanut butter lovers. With its creamy filling, rich chocolate shell, and stunning presentation, it delivers everything you could want in a homemade treat.
Whether you are making it for a special celebration or simply satisfying a sweet craving, this dessert is guaranteed to impress everyone who tastes it.
Simple ingredients, easy preparation, and incredible flavor make this one of the best no-bake desserts you can create at home.
Try this Giant Peanut Butter Cup recipe today and enjoy a giant homemade version of the famous Reese’s-inspired treat.